Products originates from design
When we develop a new LED luminaire, we look at it from seven angles: light, electricity, heat, appearance, process convenience, quality, and extensibility. Every decision is made to meet your real-world needs — not just specs on paper.
- 1. Light
We consider the use environment first. The goal: achieve required illumination, avoid light pollution, and protect human eyes. For functional lighting (plant lights, meat display lights, medical lamps, etc.), we focus on the exact spectrum you need. - 2. Electricity
The electrical part must be safe and reliable. We ensure compliance with relevant standards — EMI, EMC, lifetime, and reliability are all built into the design, not just tested at the end. - 3. Thermal
LEDs generate heat. Proper thermal design (conduction, radiation, convection) keeps both LEDs and drivers cool. That directly affects reliability and lifetime — which means safer, longer-lasting products for your customers. - 4. Appearance
Good industrial design looks simple and beautiful. It takes experience to get right. Our core R&D team has spent years refining this — so we can meet your aesthetic expectations without compromising function. - 5. Process convenience
We design for mass production. Easy assembly, high yield, efficient processes — these lower costs while maintaining quality. The result: a product that lasts and is reasonably priced. - 6. Quality
Quality comes from design, not just inspection. Material selection, reliability, testability, and cost are all considered at the earliest stage. That’s how we deliver products that meet both your requirements and international standards. - 7. Extensibility
When a product’s accessories can be used across multiple products, costs go down — and so does your price. We design with compatibility in mind, so you get more value.
A modern LED lamp is a system: electronics, software, PCB, mechanical structure, thermal management, process, quality, cost, optics, and electricity. Good design balances all of them to achieve the best price-performance ratio.
That's what we do.


Research and development design of the electronic part
A:LED pcb Research and development design
- 1.Understand the overall electrical requirements of the luminaires your customers expect.
We determine power, voltage, and circuit configuration based on the target country’s voltage and standards, combined with housing thermal conditions.
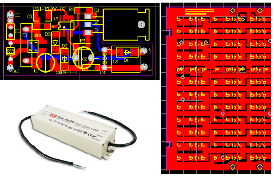
- 2.Use software like AD to design circuit diagrams and PCB layouts.
We integrate component selection, spacing, thermal vias, trace patterns, test points, machine vision marks, and assembly marks — all factors that affect performance, cost, assembly, and testing.
- 3.Confirm PCB material (different materials affect cost, heat dissipation, and performance).
- 4.Work with PCB manufacturers to finalize board material, solder mask color, copper thickness, and other production details.
- 5.Build samples, assemble electronic components, and test/verify. If the design intent is not met, we adjust. Once confirmed, we assemble into finished products and freeze the standard for customer approval.
- 6.Based on confirmed results, we create inspection standards and production processes.
B: LED Power Design – Selection
- 1.For self-designed drivers: design the PCB, select housing, terminals, wiring, assembly method, and water-resistant treatment as needed.
- 2.After assembly: test, aging, reliability, EMI/EMC, and electrical parameters.
- 3.For purchased drivers: select based on light source, housing, relevant standards, then test aging, reliability, EMI/EMC, heat dissipation, waterproofing, and electrical parameters. Only after passing do we assemble into finished lamps.
- 4.Re-test the complete luminaire: aging, reliability, EMI/EMC, thermal, waterproofing, and electrical parameters — double confirmation.
- 5.Create production processes and test standards based on confirmed results.
C.Design programming of controllers, design and development
- 1.For our own control system: after PCB design, assemble components, program the relevant ICs using a programmer (see image above), and mount ICs on the PCB.
- 2.Run reliability tests: EMI/EMC, interference, waterproofing, electrical parameters, cascade installation debugging — confirm performance.
- 3.For purchased control systems: first test reliability, EMI/EMC, interference, waterproofing, electrical parameters. Then combine with our luminaires and re-test the whole system.
- 4.Once confirmed, make an effect video and send to you for approval.
- 5.Create inspection standards and process documents.


Research and development design of the structural part
- 1.Understand your overall needs: expected results, electrical parameters, lighting requirements, use environment, application location, waterproof rating, etc.
- 2.Consider human aesthetics and artistry. Use CAD, Creo, and other software to design the overall appearance. For self-designed products, we create multiple options and select by internal vote.
- 3.Refine the selected appearance design, fully considering production, heat dissipation, waterproofing, optical treatment, materials, processing technology, mold feasibility, etc.
- Use Creo to create source files.
- 4.Perform thermal simulation and analysis using software like ANSYS.
- 5.When theoretical design meets goals, build a hand sample or 3D print to test actual effects.
- 6.Proceed to mold making. Work with the mold factory to define inspection standards.
- 7.Confirm the mold with you, get your feedback, then double-confirm with the mold factory.
Note: Because the structural housing is not delivered separately — electronics, optics, waterproofing, etc., are integrated — final testing is always done on fully assembled lamps.


Research and development design of the optical part
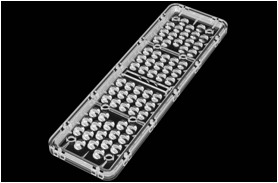
A.LED lens design and development
- 1.Understand your overall lighting needs: desired effect, uniformity, angle, spot shape. Or tell us the use environment and application, and we help confirm the lighting effect according to international standards.
- 2.Know which LED you use (brand, model, type). Or we recommend an LED based on step 1.
- 3.Based on photometric distribution and spectral characteristics, design and create light source files.
- 4.Confirm lens material (PC/PMMA/glass, etc.) — you specify, or we advise based on material properties.
- 5.Confirm lens finish: clear, frosted, or milky white.
- 6.Design drawing files: use Pro-E for models, LightTools and TracePro for optical analysis.
- 7.Export IES files, simulate and analyze in Dialux, or make hand samples for physical testing. If the effect is not achieved, adjust; if OK, proceed to mold.
- 8.Confirm mass production samples with the lens factory, define quality standards, mark unacceptable defects.
- 9.Confirm mass production samples with you, get your feedback, then double-confirm with the factory.
B:Auxiliary light design
- Auxiliary optical design mainly uses different materials to secondarily process the light output: films, reflectors, scattering, refraction, paints, reflective coatings, or fiber optics for light conduction.
C:Other optical designs
- Many optical treatments are integrated into the housing structure. For those, refer to the structural design section.
From individual factors to a finished luminaire – system thinking in action
LED luminaires require comprehensive consideration of electronics, structure, appearance, optics, thermal management, waterproofing, processing, assembly, testability, and materials. Our core R&D team has over 10 years of experience in the LED industry — we have the expertise to meet your needs.
Reliability detection of The R-D
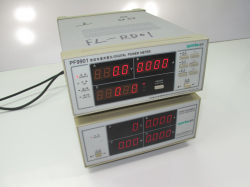
Smart power meter
Measures lamp electrical parameters: power, current, voltage.

Multimeter
Checks PCB continuity, current, voltage, component parameters.
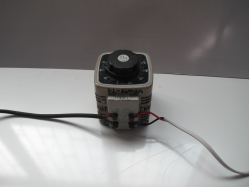
AC adjustable power supply
Simulates real-world electrical environments (e.g., 110V, 230V inputs).

Photoelectric integral ball
Measures spectral parameters of LED beads and complete luminaires.

Illumination meter
Measures illumination levels.

Micromagscopic
Magnifies to inspect LED beads, chips, and material composition.

Single-point thermometer
Measures LED junction temperature.

Multi-point thermometer
Monitors heat distribution across different parts of the lamp.

Imitation impact instruments
Simulates switching actions to measure electrical parameter changes.

DC adjustable power supply
Simulates low-voltage products (DC12V, DC24V, DC5V, etc.).

Fluke Universal Watch
High-accuracy electrical parameter measurement.
Long-term aging rack
Performs 1h, 4h, 8h, 24h, 1000h continuous lighting aging tests.

Various rulers
Measures dimensions of lamps and components.

Waterproofing test
Uses showers, containers, etc., for initial IP rating checks.

Scale
Measures weight of lamps and components.
Other tests
For tests that are rarely needed in-house, we partner with third-party laboratories such as TUV and UL.
Samples, documents and data management
1.All customer samples are stored in dedicated sample cabinets with proper labeling, moisture protection, and sealed packaging.
2.If a sample needs to be disassembled, we measure parameters before disassembly, photograph complete and semi-finished states, and properly label and seal the raw materials for preservation.
3.Every sample sent to you is carefully documented with measured parameters and photos. When necessary, we make two copies — one for you, one for our records.
4.All sample parameters and photos are saved both as printed copies and electronic files.
5.If a sample is loaned to the quality department or a material supplier, we register the loan, track parameters, and ensure proper return and restorage.